Success as a Validator
Running a validator node on TRN is only the beginning. To earn meaningful rewards and remain active in the validator set, you must actively attract nominators and set a competitive commission rate. Validator success is measured by the total rewards earned over each 90-day cycle, and those rewards are directly influenced by your ability to gather nominations and set a fair commission. This guide outlines the two key areas you need to focus on:1. Set a competitive Commission Rate
Your commission rate determines how much of the staking rewards you take before the remainder is shared with your nominators. While you deserve fair compensation for your time and infrastructure costs, setting a commission that is too high will drive nominators away. A competitive rate:- Signals fairness to nominators
- Encourages more stake to be delegated to your validator
- Leads to higher total rewards in the long run
2. Attract Nominators
Validators depend on nominations. The more stake backing your validator, the larger your share of the network’s staking rewards. Without nominations, your validator will likely earn little to no rewards, even with perfect uptime. To increase nominations:- Promote your validator on community channels (Discord, forums, social media)
- You can set a custom RNS to make your validator more easily identifiable in the dashboard
- Highlight your reliability, performance, and low commission
- Engage with your nominators, transparency builds trust
- Ensure consistent uptime and proper configuration
Requirements
- A non-custodial FuturePass or an EOA account with at least
5 XRPto pay for 3 transactions and a minimum100_000 ROOTfor staking. - A continuous running node that meets the following requirements:
Validators Election Process
Anyone meeting the above requirements can signal their intention to become a validator. However, only a limited number of validator nodes are elected in each staking era (24 hours). The remaining nodes will be on the waiting list until the next era, to rejoin the election process. The election process follows a set of well-known algorithms in the Substrate blockchain ecosystem to find the most optimal way to satisfy the three metrics below:- Maximize the total amount at stake.
- Maximize the stake behind the minimally staked validator.
- Minimize the variance of the stake in the set.
Setup Instructions
Step 1: Run a validator node
Follow the instructions in Running a Node to have your validator node up and running. It’s important to have your validator node set up with telemetry support to ensure that it can be properly monitored.Step 2: Generate session keys
Run acurl command targeting your node to generate its session keys. This is an important step to link your node with your validator account.
Info: Update the
"localhost:9944" to your node hostname accordingly."result" field of the response, leave the terminal open with the response, as we will need to use it in Step 5.
Step 3: Connect FuturePass EOA account with the Portal
- Go to the Portal Account page and select From Ethereum Wallet.

- Select the EOA account with FuturePass that you want to as validator when the “Connect with MetaMask” dialog opens up and click Next.
- Confirm both your EOA account and FuturePass account appears on the Account page.
Step 4: Stake the required ROOT amount
- Go to the Portal Extrinsics page and input the values as per the screenshot below:
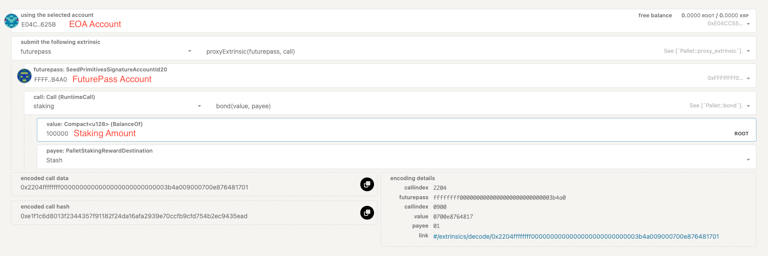
- Click Submit Transaction when done and select Sign when prompted by MetaMask.
- The transaction is confirmed when a green tick appears in the top right corner.
Step 5: Set session keys from your node
- Go to the Portal Extrinsics page and input the values as per the screenshot below, with the session keys value from Step 2.
 |
|- Click Submit Transaction when done and select Sign when prompted by MetaMask.
- The transaction is confirmed when a green tick appears in the top right corner.
Step 6: Request to validate
- Go to the Portal Extrinsics page and input the values as per the screenshot below, with the session keys value from Step 2.
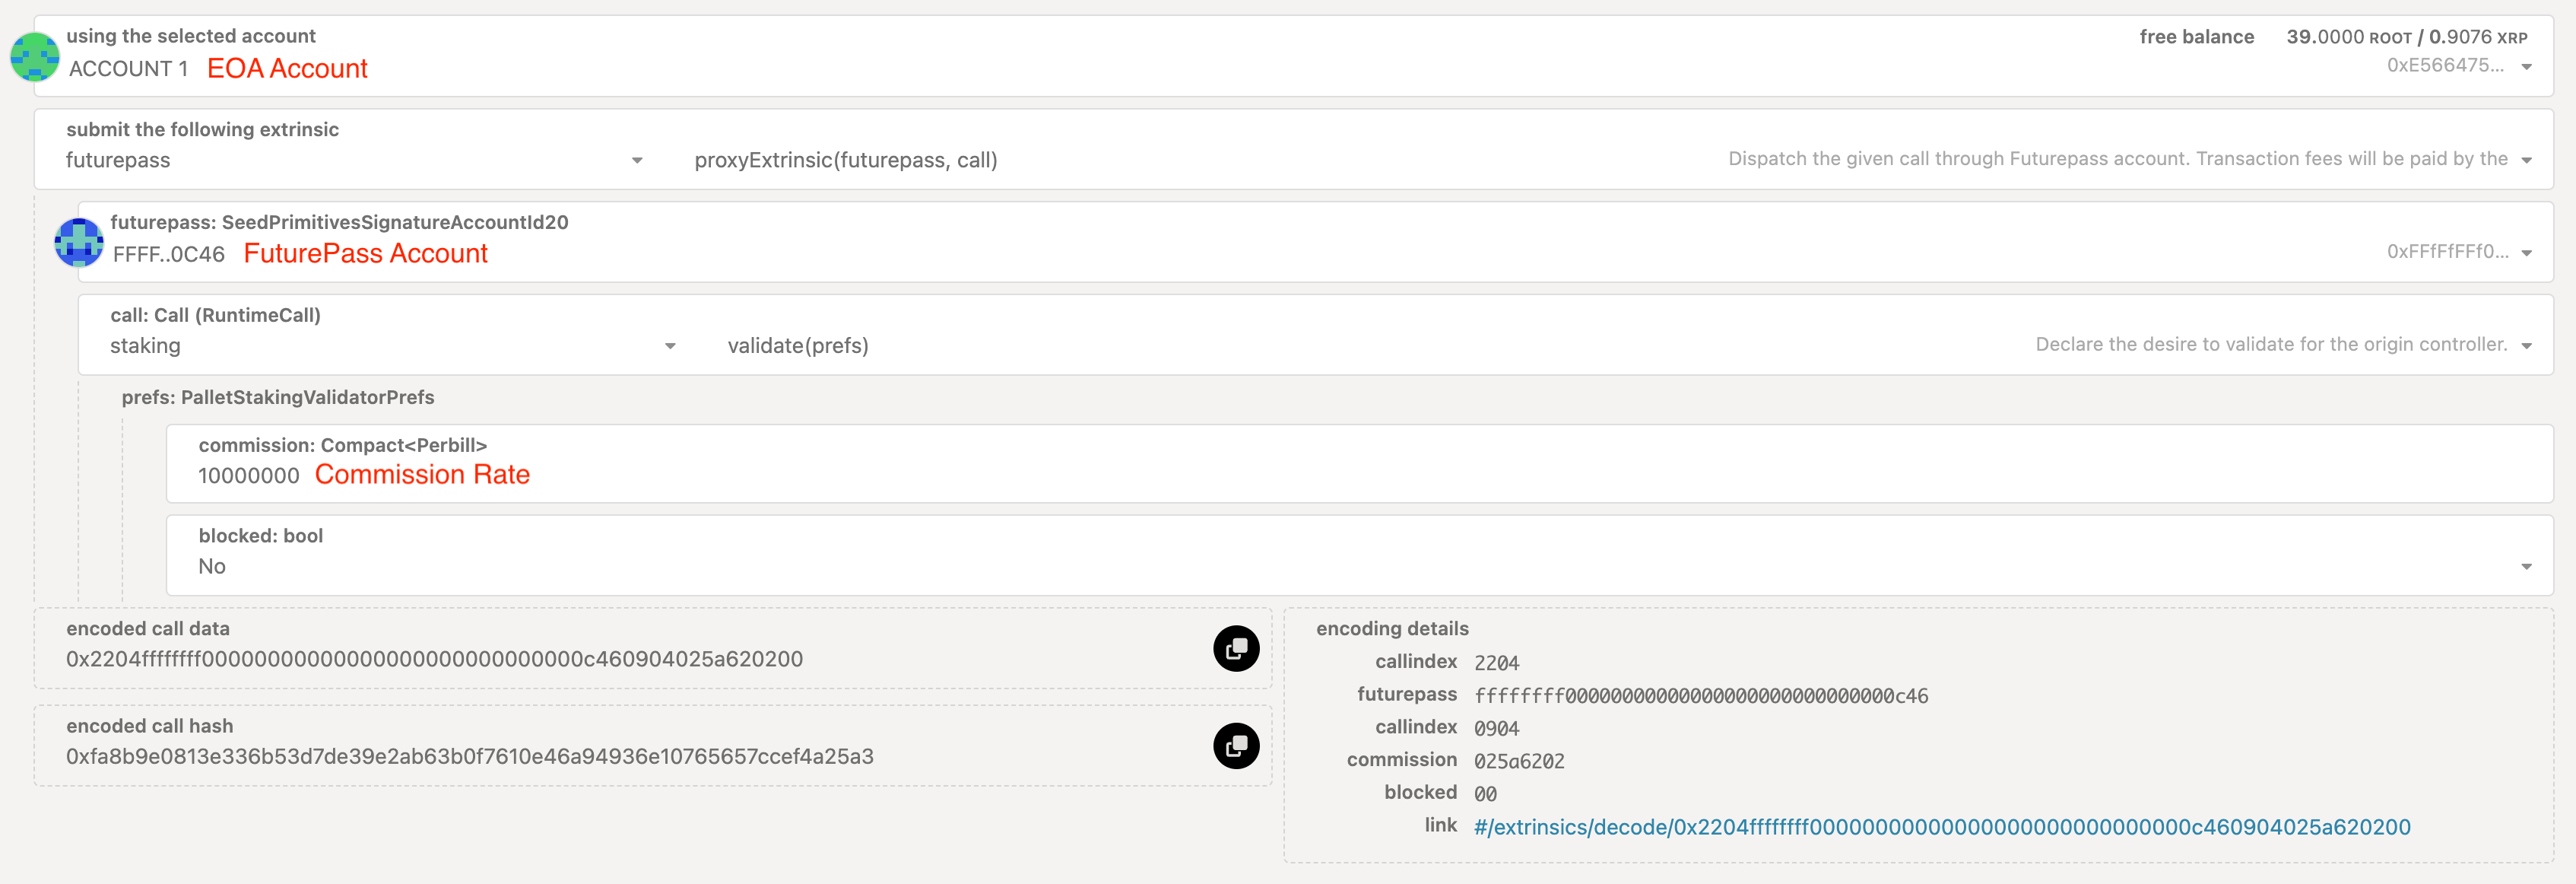
Tip: The commission rate is per billion, which means
10000000 = 1%, 100000000 = 10%.- Click Submit Transaction when done and select Sign when prompted by MetaMask.
- The transaction is confirmed when a green tick appears in the top right corner.
Step 7: Confirm your validator node is on the Waiting list.
Go to the Portal Staking page and select the Waiting tab and confirm your FuturePass account is on the list, with the correct commission rate: